|
 Swing
Swing
JRadioButton
This
tutorial describes the Swing JRadioButton class.
JRadioButton
Class
Plain
JRadioButton
Image
JRadioButton
Other
JButton Methods
JRadioButton
Groups
The
JRadioButton Class
A radio
button group exists to allow the user to select a single option from a group of
options. When radio buttons are part of a radio button group then only one
of them can be selected at any one time. You can
use the JRadioButton
class to implement radio buttons. You can also put radio buttons in
menus using the JRadioButtonMenuItem class.
There
are no less than seven constructors that can be used to create a JRadioButton
because you have the choice of creating a radio button with a normal circular selection
area or a radio button where the circular selection area is replaced by an
image.
|
|
Creates
a radio button
with no text, no icon, unselected
|
|
|
Creates
a radio button
with the specified text, no icon, unselected
|
|
|
Creates
a radio button
with the specified text, no icon, and selected if b is true
|
|
|
Creates
a radio button
with no text, the specified image, unselected
|
|
|
Creates
a radio button
with no text, the specified image, and selected if b is true
|
|
|
Creates
a radio button with
the specified text, the specified image, unselected
|
|
|
Creates
a radio button
with the specified text, the specified image, and selected if b is true
|
Plain
JRadioButton 
To
create a plain unselected radio button, we can use the second constructor listed
in the table above, with a line of code such
as:-
JRadioButton
eyeballRadio = new JRadioButton("Sir EyeBall");
Using
the third constructor listed in the table above, I could create a plain radio
button with the circular selection area initially in a selected
state:-
JRadioButton
eyeballRadio = new JRadioButton("Sir EyeBall", true);
The
applet below shows a group of radio buttons with plain circular selection areas,
all of them initially unselected. These radio buttons were added
to a ButtonGroup so only
one can be selected at a time.
~~~Applet~~~
Image
JRadioButton 
You
can specify images to be used in place of the standard selected and unselected
circular area. To do this we need to create an Icon. We can use
the ImageIcon class for this:-
ImageIcon
    imgUnselected = new ImageIcon (getImage
(getCodeBase(),"sadface.gif"));
Then we can
use the variable that references the ImageIcon object in the
argument for the radio button's constructor:-
JRadioButton
frogRadio = new JRadioButton("Frog Dance", imgUnselected);
The
image specified at radio button creation time is the image that will be used
for the unselected state. This means we have to specify another image
to be used when the radio button is in the selected state. To do this
use code such as:-
ImageIcon
    imgSelected = new ImageIcon (getImage
(getCodeBase(),"happyface.gif"));
frogRadio.setSelectedIcon(imgSelected);
Don't
forget to place your image file in the same folder as you class file.
The
applet below shows image radio buttons. I have specified an image of a smiley
face and an image of a unsmiley face to be used in place of the standard selected and
unselected circular area.
~~~Applet~~~
|
 
Important:
-- Using images in applets?
Then read this
to understand how to include images in web page applets using lines of code like:-
ImageIcon
    imgUnselected
      = new ImageIcon (getImage
(getCodeBase(),"sadface.gif"));
Don't forget
to import the package java.net.*

|
Other
JRadioButton Methods
Here are some
methods we can use with the JRadioButton class. You should note
that this is not a full list, there are lots of other methods. These are
a similar set of methods to those of the JButton and JCheckbox
class, since they all inherit from JComponent and AbstractButton.
You
should check out the inherited JComponent
and JAbstractButton
class methods.
|
|
Set
the text displayed by the
radio button.
|
|
|
Enable
or disable the radio button
using true
or false as the argument
|
|
|
Set
the font of the text on the
radio button
|
|
|
Set
the horizontal position of the radio
button's text relative to the button's
image
using as the argument: JRadioButton.LEFT, JRadioButton.CENTER or
JRadioButton.RIGHT.
|
|
|
Set
the vertical position of the radio
button's text relative to the buttons image using
as the argument:
JRadioButton.TOP, JRadioButton.CENTER or JRadioButton.BOTTOM.
|
|
|
Add
a tool tip that appears when the cursor is over the
radio button.
|
|
|
Sets
the radio button
to selected if b is true else set it to unselected.
|
|
|
Returns
true if the radio button
is selected and false if is unselected.
|
|
|
Sets
the image to be used when the radio
button is in the selected state.
|
|
|
Use
setRolloverIcon(Icon
  m)
with setRolloverEnabled(true)to
make the radio button
display the specified icon when the cursor passes over it.
|
~Now
try the activity~
|
Activity A |
Using appropriate
methods from the JCheckBox, JAbstractButton and JComponent class,
create an applet with ...
- at least one panel to contain some radio buttons
- four radio buttons similar to the first applet shown on this page
- set the font color of the radio button labels to any color of your choice, (apart from black).
- set the font of the radio button labels to Arial, italic and 10 points in size. The
Font class is explained
in the Graphics tutorial.
- set the panel background color to any color of your choice
|
JRadioButton
Groups
It
is normal to group radio buttons together so that only one can be selected at
any one time. If you have completed the activity above you may notice
that it is possible to select more than one of the radio buttons at any one
time.
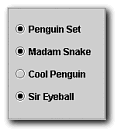
For
instance, here is the code for creating four JRadioButtons:-
   JRadioButton penguinSetButton = new JRadioButton ("Penguin Set");

     JRadioButton           coolPenguinButton = new JRadioButton ("Cool
   Penguin");

     JRadioButton           snakeButton = new JRadioButton ("Madam
   Snake");

     JRadioButton           eyeballButton = new JRadioButton ("Sir
   Eyeball");
|
The picture shows these
radio buttons and as we can see, more than one of them can be selected
at a time.
It is not difficult to change this so that
only one is ever selected out of a group. |
|
We just have to
create a ButtonGroup instance and add the radio buttons to this
group:-
//
    create a ButtonGroup
myButtonGroup = new
    ButtonGroup();
//
    add the radio buttons to the ButtonGroup

               myButtonGroup.add(penguinSetButton);

           myButtonGroup.add(snakeButton);

           myButtonGroup.add(coolPenguinButton);

           myButtonGroup.add(eyeballButton);
That's it.
Now these radio buttons act as a mutually exclusive selection group.
~Now
try the activity~
|
Activity B |
Assuming you have carried out Activity A
then...
- create a
ButtonGroup instance
- add your radio buttons to this
ButtonGroup
|
|


