|
 Visual Basic Tutorial
Creating Menus
Objectives
This guide will help
you to: -
- add menus to your application
Introduction
The Menu Editor
Creating the Menu Bar
Creating Menu Items
Using the ALT Key Shortcuts
Using the CTRL Key Shortcuts
Menu Click Events
File>Exit
Help>About
Edit>Copy
Edit>Paste
Edit>Cut
Help
Desk Exercise
Most Windows applications have a menu bar that allows the user
to choose actions to perform within an application without cluttering up the
form with multiple command buttons.
Here is a simple Notepad Menu:-

Visual Basic allows the programmer to add a menu bar to an application that
has all the common features of a standard Windows menu bar. Visual Basic uses
the Menu Editor to create menu structures.
It is useful to layout a menu on paper before designing it in the menu
editor, a typical menu structure is shown below: -
|
File |
Edit |
Window |
Help |
|
|
New
Open
Close
Save
Print
Exit |
|
Cut
Copy
Paste |
|
1. Window name
2. Another window name |
|
Contents
About |
After the menu has been designed on paper, the menu editor
dialogue box can be used to create the menus.
The easiest way to get used to the Menu Editor
is to use it. Lets create a simple menu.
Choose a form you are going to add the menu to. Open
up the Menu Editor .
To access the Menu Editor dialogue box, first make
sure you are displaying the form you wish to add the menu to. It won't
work if you are displaying the white coding window.
|

|
Use the menu design toolbar button. |

|
|
|
Select Tools>>Menu Editor
from the VB menu |
|
|

|
Hit the [CTRL + E] keystroke combination. |
|
|
|
|
|
You should see...

The most important parts of the Menu Editor are the
Name and Caption
properties.
· Caption - the text displayed on the menu.
· Name - the name by which a menu option is referred to in the code.
|
|
Type in the following:-
File in the Caption box
mnuFile for the Name
Click on the Next button |
 |
|
|
Now type in the following:-
Edit in the Caption box
mnuEdit for the Name
Click on the Next button |
 |
|
|
Keep on adding menu items till you have a list like mine.
I.e. File, Edit, Window, Help
Then close the Menu Editor by
clicking the OK button |
 |
Your form should now display a simple menu like so...

|
 
Note: You must make sure you give
every menu item a Name. Also, you cannot use the same
Name more than once. If you don't include a Name,
you will get an error message when you try to close the menu editor.


|
If you run your menu program you will notice that clicking on
the menu does not make any menus drop-down. That is what we need to do
next - add items to each menu in the bar to make drop-down menus.
Open up Menu Editor again.
Select the Edit menu item and click on the Insert
button.
|
|
Type in the following:-
New in the Caption box
mnuNew for the Name
Click on the Ok button. Run your program.
You will see that the New menu item is not in the correct
place. It should be inside the File menu.

We can correct this. Open up Menu Editor
again. |
 |
|
|
Select the New menu item. Click on the indent arrow
button

This will make the New menu item go
inside the File menu.
Close the menu editor and click the File menu.
You will see that the New menu item is in the correct place
now.
 |
 |
|
Note:
The menu names are typed in flush left to the menu design window but using
the indent button indents any menu options. If an option is indented twice
it will become a sub menu of a menu option.

If a menu option is placed incorrectly it can be moved through the menu
structure by using the up and down arrows in the menu design window.
|
Now let's finish the menu. Create a menu that has the
same menu items as mine - shown in the pictures below.
|
|
Create this in the Menu Editor
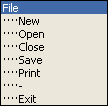 |
This should give you the menu shown to
the right. |
|
 |
|
|
|
|
|
|
|
|
Create this in the Menu Editor
 |
This should give you the menu shown to
the right. |
|
 |
|
|
|
|
|
|
|
|
Create this in the Menu Editor
 |
This should give you the menu shown to
the right. |
|
 |
|
|
|
|
|
|
|
|
Create this in the Menu Editor
 |
This should give you the menu shown to
the right. |
|
 |
Most menu names and menu options have an underlined letter used for accessing
the option from the keyboard. Try it for yourself. Open up say Microsoft
Word and you will see many of the menu items have an underlined
character. Try pressing ALT-F. This will open up
the File menu. Now press N. This
will select the New item.
A few more ALT shortcuts are listed in the table
below
|
File |
Edit |
|
|
New
Open
Close
Save
Print
Exit |
ALT F N
ALT F O ALT F C
ALT F S ALT F P
ALT F X |
|
|
Cut
Copy
Paste |
ALT F T
ALT F C
ALT F P |
ALT shortcuts can be created by opening up
Menu Editor and by placing an ampersand
(&) in the Caption before the letter to be underlined.
|
Activity A |
For the menu items in the list above, create
ALT key shortcuts by opening up the Menu Editor. Place
an ampersand (&) in the Caption before any
letter to be underlined.
|
Another method for accessing a menu item using the keyboard
is by using a CTRL key shortcut instead of the ALT key. Many users for
example, are used to pressing CTRL S for saving a document or CTRL
C for copying and CTRL V for pasting. There are others.
Some are listed below.
|
File |
Edit |
|
|
New
Open
Close
Save
Print
Exit |
CTRL O
CTRL S CTRL P |
|
|
Cut
Copy
Paste |
CTRL X
CTRL C
CTRL V |
|
Activity B |
For the menu items in the list above, create
CTRL key shortcuts by opening up the Menu Editor. You
can add a shortcut to a menu item by selecting the one you want from
the shortcut drop-down list.
|
Although you have learnt how to create your menus, you have not yet learnt
how to make them do something when the user clicks on them. You place
the code for making something happen inside each menu item's click
event. Let's have some examples:-
Go to your form. You should have created a File>Exit menu
item. Click on the File>Exit menu item. This should
take you to the white coding window where you should see the following.
|
|
|
Private Sub
mnuExit_Click()
End Sub |
All we need to do is add the code inside this
click event sub routine to close the application.
The command is..
Unload Me
I.e.
|
|
|
Private Sub
mnuExit_Click()
Unload Me
End Sub |
You should also unload any other forms in your
application. e.g. Unload form1 or Unload frm2 etc.
Now when your program runs when you click on
File>Exit your program should close.
Do you have an About form? If
not perhaps you should create one. To display the About
box when the user clicks on Help>About we just need to put the
appropriate code in the click event for this menu item.
Go to your form. Click on the Help>About menu item.
This should take you to the white coding window where you should see the
following.
|
|
|
Private Sub
mnuAbout_Click()
End Sub |
All we need to do is add the code inside this
click event sub routine to show the About form.
The command is..
frmAbout.Show
You have to use the name of your own
About form though. Mine is called frmAbout but
yours is probably called something else.
|
|
|
Private Sub
mnuExit_Click()
frmAbout.Show 'make use you use your
form name
End Sub |
Now when your program runs it will show your
About box when you click on Help>About.
Have a look at say Microsoft Word's About
box. When it appears, can you go back to the main window without
closing the About box first? I'll bet you can't.
We can make sure that our own About
box must be closed before allowing the user to go back to the main program
window too. All we have to do is change the frmAbout.Show
line too..
frmAbout.Show vbModal
Try it and you'll see the difference.
One common aspect of most menus are the Cut, Copy and
Paste options on the
Edit menu which allow an application to interact with the windows clipboard.
Visual Basic allows the user to send information to the clipboard and receive
information from the clipboard.
To send information contained in a text box to the clipboard: - the
syntax is
Clipboard.SetText controlname.property
Let's try it. But first we need say a textbox on the form so we can copy
text from it to the clipboard. So at a textbox to your form. I will
assume it's name is Text1.
Now click on the Edit>Copy menu item. This should take
you to the white coding window where you should type in the following.
|
|
|
Private Sub
mnuCopy_Click()
Clipboard.Clear
Clipboard.SetText Text1
End Sub |
OR we could be more specific and have Clipboard.SetText Textl.SelText for only
selected text.
When you run your program and type something in the textbox and select
it, click on Edit>Copy. To check if it has copied it,
opun up notepad and see if it pastes the word you typed into the textbox.
To receive text based information from the clipboard: - the syntax is
controlname.property = Clipboard.GetText ()
Let's try it. But first we need say another textbox to paste the
clipboard contents to. So create another textbox on your form. I will
assume it's name is Text2.
Now click on the Edit>Paste menu item. This should
take you to the white coding window where you should type in the following.
|
|
|
Private Sub
mnuPaste_Click()
Text2 = Clipboard.GetText ()
End Sub |
When you run your program and type something in the textbox, click on
Edit>Copy. Now place your mouse cursor in the second textbox
and click on Edit>Paste. This should paste whatever you
typed into the first textbox into the second textbox.
Cutting is copying a word or group of words to the clipboard but then you
additionally clear the place where you cut the information from.
To cut whatever word is in the first textbox on your form, all we need to
do is copy the information to the clipboard and then clear the textbox.
So, click on the Edit>Cut menu item. This should take
you to the white coding window where you should type in the following.
|
|
|
Private Sub
mnuPaste_Click()
Clipboard.Clear 'clear the clipboard
Clipboard.SetText Text1.SelText '
copy whatever is selected in the textbox
Text1.SelText = "" ' clear the
textbox
End Sub |
When you run your program and type something in the textbox, click on
Edit>Cut. Your textbox should be cleared. Now place your
mouse cursor in the second textbox and click on Edit>Paste.
This should paste whatever you typed into the first textbox into the second
textbox.
You will need to add a menu to your 'help
desk' application. The menu you need will depend totally on how you
have designed your forms.
Since you will have at least two different forms, a
troubleshooting form and a fault log
form, you will need to be aware that the menus on each form may well be
slightly different. For example, do you think you would need to
File>Save menu item on both forms? I would have thought you
would only need it on on the fault log form.
It is best to separately draw the menu you want for each
form.
~Try the activity~
|
Activity C |
Have you created your 'troubleshooting' form?
If so, try designing the menu
on paper before using the menu editor. You should draw your
menu on a piece of paper or in Word. E.g.
|
File |
Edit |
Window |
Help |
|
|
Print
Exit |
|
Copy
|
|
1. Window name
2. Another window name |
|
Contents
About |
Now justify each menu
item by explaining what will happen when the user clicks on each
item. I.e.
File>Print
When the user clicks on this,
whichever problem the user is looking at in the listbox will be
printed out.
File>Exit
When the user clicks on this
the program will close.
Edit>Copy
When the user clicks on this
whichever problem the user is looking at in the listbox will be
copied to the clipboard. This will allow them to paste it into
another application, say Word or Notepad for example.s
I will let you carry on with
the rest. Your menu may have different items. It is
useful for you to justify each menu item because it will make you
think carefully if it is a sensible item or not.
|
~Now try the activity~
|
Activity D |
Have you created your 'Fault
Log' form?
If so, design a menu for it in the same
way as above.
|
Fini
|
|
| |
|


